
I did it. I DID IT! I made jeans… JEANS, PEOPLE! Do you know what this means? This means I can sew anything! ANYTHING! I AM UNSTOPPABLE!

Let me tell you, Heather from Closet Case Files is a GENIUS. She somehow managed to create a jeans pattern that beautifully fits most women. How is that possible?! Pattern drafting genius or witchcraft. Either way, I won’t judge.

As most of you probably already know, these are the Ginger Jeans, View B. Almost a year ago, I bought the PDF pattern and this amazing Italian denim from GirlCharlee.com and it was sitting in my stash, just waiting to turn into this awesomeness.
I had been hemming and hawing about wanting to make pants for a while, but rather than having fears of inserting a zipper fly or installing rivets, I was scared of the fit.
For my whole life, buying well-fitting jeans has been an ordeal. I’ve lived most of my life in jeans that were too small in the hips and too big in the waist (thanks, generous badunkadunk). And let’s not mention what happens when I bend down to sit or pick something off the floor. Let’s just say crack kills, people.
In the past couple of years, I found a brand that fit me pretty well and prevented most of that butt crack gaping… Lucky. I had never tried Lucky Jeans before as they’re kind of pricey, but now that I’m a grown-up with a grown-up salary, I caved and bought those $80 pair from the outlet store (still a bargain finder!). They fit well enough, but like most jeans today, the waist isn’t at my waist. It’s more at my bladder which makes for uncomfortable times when sitting for a long periods after drinking a gallon of water (thanks, desert living).

But lo, and behold! The high-waisted jean! I shied away from this rise in the past because, let’s face it, they remind you of mom jeans, right? Well, I’m a convert now. No more waistband cutting into my bladder! No more butt crack! I can bend over with confidence now! And what’s better, I can finally wear all the T-shirts I bought when I lived in Japan because they are crop top length on me.

If you’re thinking, “But RED, I can’t sew jeans! They’re too difficult! I don’t have enough sewing experience!” I say, “BULL!” Heather has a life-saving sew-along that holds your hand throughout the whole process. If you can make a dress or a pillowcase, you can make jeans. Just take it slow and stay calm. I do admit there were times where I had to step away and come back later because I was getting impatient, but slow and steady wins the race… and the prize is FABULOUS.
Let’s get into the details, now, shall we?
As I said before, the fabric is from GirlCharlee.com. Unfortunately, it’s no longer available as it was one of those times where they received bits of designer fabrics to sell off. Here’s the description: Candiani Millinum Chocolate Stretch Denim Fabric – High quality Candiani Italian imported chocolate, very neutral black brown, stretch denim fabric with a bit of spandex for good recovery and movement. Stretch is about 20% across the grain and also has a natural bias stretch of about 25%. Fabric has a medium amount of tate-ochi, or lighter vertical lines visible in the fabric that give it a stylish, un-uniform appearance.
The great thing about the fabric is it was very affordable! For 2 yards, it was $23 USD total. If you add in the notions, these jeans cost less than ~$30 to make!
This denim has a bit of weight to it, so these jeans will do really well in the winter. It also feels very sturdy, so this fabric can take a beating. I’ve worn them a handful of times already and the recovery is phenomenal. They’re not as stretchy as the stretchiest skinny jeans, but they’re still comfortable and there is minimal to no bagging at the knees after a day of wear. I haven’t washed them just yet and they still look like these photos, which were taken before wearing them “for real.”

At first, I cut a size 12 in the waist, grading to a 14 in the booty and legs. The 14 was way too big, especially for a stretch denim. Thank goodness Heather suggests basting your jeans together early in the process to check the fit. So after ripping out the basting stitches and laying my fabric back onto the pattern pieces, this time, trimming them down to a size 12 (hint: you can just take in the side seams as there’s really no difference in the booty and crotch… I learned the long, tedious, and hard way). So these are a straight size 12, same seam allowances everywhere!

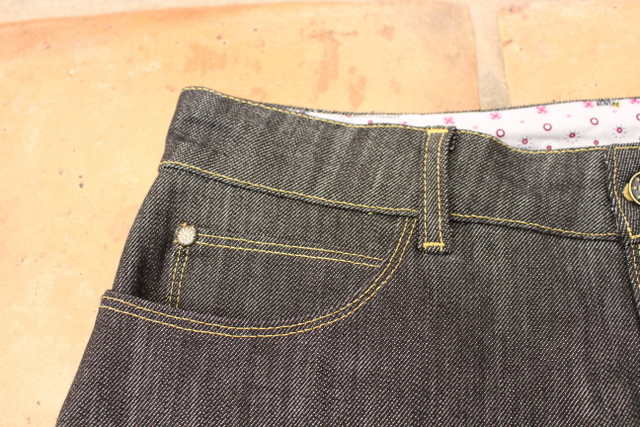
However, the straight 12 still created some gaping in the waist at the back, which is what I was expecting. I ended up making 1/2 inch darts on each yoke piece and re-drafted my waistband piece with those 1/2 inch darts, which made it curved. End result?

A perfect hug for dat booty! You can barely see the darts in the yoke on this pair, but for my next pair I will re-draft the yoke pieces so it’s one continuous piece of fabric.

One of the best things about making your own jeans, in my opinion, is coming up with the back pocket design. You can get as creative as you want or copy a designer’s pattern and try to pass your jeans off as theirs! But wearing your own handmade jeans is way cooler than sporting a $300 pair of True Religion in my humble opinion.


I sketched different designs and this is the design that spoke to me the most. After seeing the end result, I think I would have extended the lines further in the center because it kind of makes my booty look wider than it should with how it is now. But I’m not complaining too much because I think my bottom looks amazing in these jeans!
I think part of the reason other than fit are how big the back pockets are and where they sit. The more booty you have, the more pocket coverage you want. Pockets that are too small make your rear look bigger, so keep that in mind if you’re not as blessed in the booty department (I’ll gladly donate some!).
OK, I have loads more pictures to share, so bear with me as I dump them all on you!

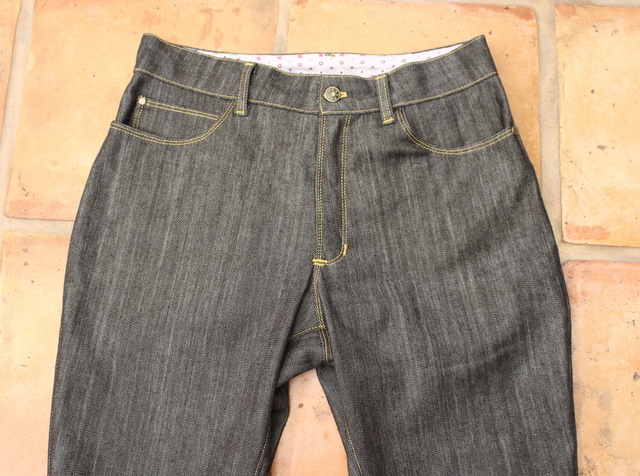
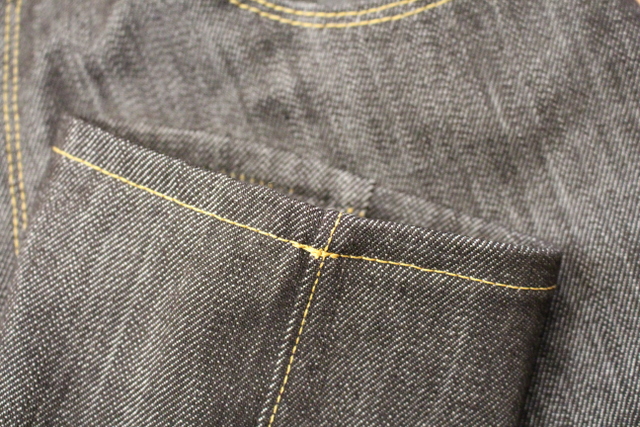
I am so in love with the color of this denim! I kind of wanted to use a different color top-stitching thread, but the choices of Gutermann at Joann’s is limited and the normal jeans color top-stitching thread worked the best.
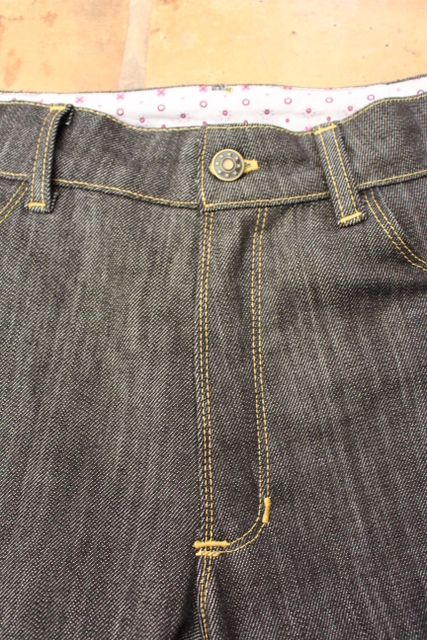
Look at that fly front! This was my first time ever inserting a zip fly and it was so easy to follow with the sew-along. After it was done, I thought, “That’s it? That’s what I was scared of this whole time? Pfffft.”

One of the best parts about making jeans is getting to use those random quilting cotton scraps you have lying around. I had just enough left over from my weird Sado Island shaped pillows to use for my Gingers.

Other than inserting the button and rivets, the button hole is always a little scary. Instead of the usual rectangle-shaped button hole, I went for the one with a curved edge on one side. I checked out my RTW jeans and they all had that curve to best accommodate the jeans button, so I copied. I also learned using Fray-Check on the button hole before cutting it open works really well! I used an Exacto-knife for precise cutting to make sure I didn’t accidentally cut the thread.

The button hole was probably the most difficult notion to insert. I bought Dritz jeans buttons and found they have a tendency to want to go in crooked. I took Helen’s advice and used the back of a cast-iron skillet to help hammer it in, but I still had to do it slowly for accuracy. But I’m happy to say that perseverance prevailed! The button is now firmly in place and straight!


The rivets were pretty fun to install. I bought these little flowered ones from Amazon.com. They came from Thailand and I got a pack of 50, so these will last me for many jeans to come.

My rivet posts were hollow, so when I trimmed them down with wire cutters, they smashed flat. No problem! I used pliers to squeeze them back into shape.
Funny story: When I was hammering away on the cast iron skillet, DD came in to see what the racket was.
“What are you doing?” he inquired.
“Installing rivets…”
“Hmph, there’s a machine for that, you know.”
“I AM HARDCORE AND DON’T NEED NO MACHINE! By the way, this is what the sew-along says to do and it’s working.”
So there.
Moving on, let’s talk top-stitching. I used the Gutermann jeans top-stitching thread in the top and regular black thread in the bobbin. Things gets too messy if you use the thick top-stitching thread for everything.
I lengthened my top-stitching length to 3.5 instead of the usual 3.0 for thick fabric. This way, it’s more visible… I think. I don’t know, I just followed Heather’s instructions! I also increased my thread tension to a 7 instead of the usual 5 and found it worked beautifully. Don’t ask me why it works better… I just did what Heather said to do!

For the bar tacks, I used my machine’s satin stitch and it worked out pretty well! You’ll also see some bar tacks in the fly and the outside hip. Supposedly they help reinforce stress areas (kinda like rivets) but again, I just did what Heather said!
The hem took me a while to figure out where I wanted it to be. I think the length is great when I’m standing, but it feels a little short when I sit. I might lengthen the hem a little for my next pair of jeans.
Now time for the guts!

I should add that the PDF file I have of the Ginger Jeans is the original pattern. Heather has since added a pocket stay, which extends the pocket pieces all the way to the fly. This helps keep the tummy tucked in and the pockets in place. I will definitely try it for my next pair.
She also added a tweak to the back leg pieces to prevent some bagginess under the butt. I shall have to try that next time, too! But for my first time, I didn’t want to stray too far from the original instructions as I wasn’t sure how they would fit or work.

I was too lazy to change the thread to match my lining fabric better. But who else is going to see it? (Other than the world right now…) And check out that fly! Beautiful! I did have to trim the interfacing down from one side as it peeked out. It looks like Lladybird found the same issue, too.

I serged all the inside seams. Freya didn’t like that too much as the right needle kept getting unthreaded. I wonder if it was a tension issue? I had to hand-crank through the really thick parts and just go slow when serging the denim altogether. Next time I think I might try flat-felled seams since now I know how the fit is going to be.
So I have definitely been bitten by the jeans-making bug. All I could think about and do while making this pair (which took me over 2 months… I’m sloooow) was to research other’s Gingers and stare at ALL THE JEANS. I’ve since moved onto less involved sewing projects to cleanse my palette, but in the back of my mind I still hear, “Jeeeeans…. jeeeeeeans!” Like a creepy Ginger zombie…


In conclusion, I think it is fitting to leave you with Ginuwine’s hit song, “In Those Jeans.” If you don’t want to watch the video as there’s ladies in their skivvies, at least take a look at the lyrics…
(Chorus) Looking good plenty tight
Is there room, any more room for me
In those jeans
Really thick, like I like it
Tell me is there any more room for me
In those jeans
Looking tasty really scrumptious
Tell me is there any more room for me
In those jeans
Looking good plenty tight
Is there room, any more room for me
Got on my ride seen you from a far
And I couldn’t stop myself from looking hard (staring)
You wore these jeans
Girl you wore these jeans and you
Made a thug want to cry something terrible
I had to have, have you for myself baby
You don’t know what those jeans do to me
Make me want to get down on one knee
You’ve got that thunder
And it only makes me wonder how it feels
To get up in those jeans
Oh those jeans
(Chorus)
You are the bomb
Girl you’re tight to death, baby
I don’t know the words to say to you
All that I know, baby all I know is that
I’m loving what I see and I’m feeling you
I want to know, all I want to know is if
I could have what’s up in those jeans
Baby can I have what’s up in those jeans
Don’t get alarmed cause I don’t mean no harm
But I love the way you wear those jeans
Levi’s, Prada, Baby Phat, I love them
Love the way you, wearing them I love them yeah
Calvin, Iceberg, Sergio, I love them
Trying to get inside of those
Yeah yeah yeah
(Chorus)
I want to say that those jeans looking good fitting right
Baby damn those jeans
Any kind doesn’t matter if you wearin’ them you look fine
Baby damn those jeans
Anytime that I see you I want in, you wear ’em well
Baby damn those jeans
You the shit you the bomb
All I want to know is can I have what’s in those jeans
Can I get in those jeans can I baby
(Chorus)

So what are my plans from here? I need to make a pair of jean shorts since it’s hot as heck here the majority of the year. I also bought some Cone Mills denim from Threadbare Fabrics for a second pair of jeans. Goodbye, ill-fitting store-bought jeans! Hello, handmade heaven!
Have you made the leap yet and sewed jeans? If you’re still on the fence, check out how gosh darn happy Hila is about her finished Birkin Flares. If she doesn’t convert you, nothing will.
-RED

Oh my giddy aunt! You have made me smile and laugh more than I have since waking up Friday morning! Thank you for that. You look ace in dem jeans. And your denim fabric looks so designer wear – I cant believe that cost you a total of 32$!!! How amazing is that. You nailed the fit too – argh- you broke me – I am getting this pattern now. Love your cat and the Genuwine reference (though I am more of a Pony girl myself LOL).
LikeLiked by 1 person
Thank you, dawlin’! I’m glad I can entertain you. 🙂 This denim IS insanely awesome. I’m really hoping GC stocks it again so I can grab even more.
I think you would totally rock the Ginger Jeans look. These with one of your Granvilles and some loafers… heck yes! Do it!
And Tasso says, “Thank you!” He’s a real sweetheart and loves to photobomb anything I do.
LikeLiked by 1 person
The title is hilarious and your happy poses are awesome! And the jeans are too, flattering and the design on the pockets!! I’ve always read curved waistbands fit better – now I’m curious – but unfortunately I’m opposite of you, my waist is big and hips are small -___- Sad life. Anyway, love them 🙂 Thanks for the inspiration. I may move this pattern up the to-do list now.
LikeLiked by 1 person
Thanks, Chui! These poses basically reflect how I feel inside about finally finishing a pair of jeans. You’ll understand what I mean when you do it, too! For your waist/hips dimensions… Jenny at Cashmerette.com had the same problem but made the Gingers work for her so you might want to see what she suggests. I can’t wait to see how yours come out!
LikeLike
These look great!
But your sewing top? Your ginger cat? They’re fantastic!
And you’re right, I really had to look for the darts in the yoke.
LikeLiked by 1 person
Thank you!! The top is from Uniqlo.com (but they’re all out now.. sorry!) and the cat is from the Humane Society, LOL! That’s Tasso and he’s a big pudding. He always around wherever I am or my husband is. ❤ He especially likes to sit on my keyboard when I'm blogging!
LikeLike
I’m so happy and proud of you! They look awesome! I love the tip of not using the jeans thread in the bobbin and using regular thread. That’s such a great idea and it will go through my machine so much easier! You’re happy post gave me giggles. Love the pictures. You really got that down to a science.
LikeLiked by 1 person
Thank you, Jamie! I’m really itching to try those Jamie Jeans soon because I love how yours came out. Agh, so many projects, so little time!
The regular thread in the bobbin really made things go smoothly. I was expecting all kinds of problems while making these with my machines, but my only issue was with my serger. I can’t blame her too much… she’s about 22 years old and I’ve put her through a lot already!
LikeLiked by 1 person
Awesome! Thanks for the lols. I live to sew pants but have yet to cross the jeans threshold. But it’s on the list. And I think you have sold me on this pattern. Go you!!! And your booty looks slammin. Hears to a juicy rump!
LikeLiked by 1 person
I think if you can tackle pants, jeans will be a breeze! The only difference I guess is the top stitching and rivets. But I swear those rivets are FUN to install.
Thanks for the compliment! Booty booty booty booty rockin’ everywhere! Yeah!
LikeLiked by 1 person
These are amazing, you are amazing, all people that sew jeans are AMAZING!!! Your top stitching is awesome and makes me feel like I need a new machine. Mine just does not stitch like that!!!
LikeLiked by 1 person
Awww, thank you!! I was worried about how the top stitching would come out, but I took it slow and my Viking was a champ. I have the Husqvarna Viking Opal 650 in case you’re curious.
Join uuuuuuus… you’ll love sewing jeans!
LikeLike
I just test drove an Opal. I’m also looking at the BL Katherine…. It’s so much pressure to decide!
LikeLiked by 1 person
FANTASTIC!! Yes, you should do a dance in those great jeans!:)
LikeLiked by 1 person
Thank you! I’m wearing them today so I’ll definitely be doing a Happy Friday dance in them once I’m finished with work! 🙂
LikeLiked by 1 person
JEANSSSSSSS!!!! (I realize that looks like what the peppiest zombie in the jeans zombie hoard would say…#noregrets)
Girl, these jeans look FAB and they look amazing on you. (That side view, tho.) I am so glad you were bitten by the jeans bug–it clearly suits you! High five!!!!!
LikeLiked by 1 person
Thanks, Mads! You did a kick ass job on jeans for your man… now it’s time to bust them out for YOU! 😀 Join uuuuuusssss…. jeeeeeeaaaaannnnsssss!!
LikeLiked by 1 person
One word. Jealous! Would you mind me sharing this on Sassy Sewing Bees in the future? I link to your post and let you know when. https://www.facebook.com/SassySewingBees
LikeLike
Thank you!! Of course I would love for you to share this… I look forward to it!
LikeLike
Thanks. I will let you know when, on this post. https://www.facebook.com/SassySewingBees
LikeLiked by 1 person
They look great! It’s a fabulous feeling when you get them done and realize that you can make jeans that fit, isn’t it! I love top stitching and the rivets and button process, dont you! You look great!
LikeLiked by 1 person
Thank you! I like it all except the button part…maybe I need better quality buttons? But top stitching is the bomb and I need to do more of it on my other non-jeans projects. 🙂
LikeLike
Well done on the jeans (and the great post ;o) Looks like great denim and I like the pocket design you made. Jeans and swimwear up there on my ‘maybe one day’ list. I have the stuff, just waiting for the right time (give me a sign universe, is it the right time now?!).
LikeLiked by 1 person
😀 Thank you! Take the plunge, here’s your sign, lol! I want to do swimwear, too but messed my first try up badly and I haven’t tried since. It was my own fault, though, as I spazzed out with the elastic. Maybe I’ll try again next year. But definitely do one thing that you’re scared to do at least every year, then you’ll realize it’s not so bad once it’s done. 🙂
LikeLiked by 1 person
Ooooooh!!!! I want to. That’d be great to have perfect fitting jeans 😍😍
LikeLiked by 1 person
Yes, try it!!! You won’t regret it 🙂
LikeLiked by 1 person
Your jeans are amazing and the fit is fabulous!
LikeLiked by 1 person
Thanks so much! ❤
LikeLike