
Hello and Zip-a-dee-doo-da! I’m currently in Disney World vacationing my little heart out! We’re with my in-laws to celebrate our 2-year wedding anniversary (Oct. 12th), DD’s mom’s birthday (Oct. 11th), and just being able to get away from work. Hallelujah!
When I go to theme parks, I like to get in the spirit of things and create something that will stand out. I enjoyed making 5-year-old girls jealous when I wore my Little Mermaid Dress to both Disney Land (2012) and Disney World (2013). I also enjoyed the attention in the Wizarding World of Harry Potter (2013) when I wore my hand-made Harry Potter Dress, which scored me a wand-choosing at Ollivander’s!
DD’s mom wanted to get in on the action this year, so my mind started racing with what to do. The only Disney fabrics available come in either quilting cotton, fleece, or a cheapo satin-type fabric (not to mention EVERYTHING is Frozen-themed now – ugh). I didn’t want her to be too uncomfortable, plus it’s really hard getting the correct fit in a woven fabric on a person who lives 1,400 miles away with a different body type. A T-shirt seemed to be the way to go – something simple, yet comfortable for those long days at the parks.
I brainstormed what to do… I’ve done applique before, but what about the stretch of the jersey of the T-shirt fabric? Would it look all wonky? I was talking to a coworker who started learning hand-embroidery. Hmmm… getting closer… I could possibly hand-embroider Disney characters onto jersey… but that’s a LOT of time and I might get the tension wrong, resulting in a wonky T-shirt. Then, as if it was a sign from God, Elizabeth of “Elizabeth Made This” posted a tutorial on how to sewing machine-embroider your child’s artwork onto a T-shirt for them.
OH MY GOD, THANK YOU ELIZABETH, YOU GENIUS!!
It was settled. I would “draw” our favorite Disney characters onto T-shirts with my sewing machine! After some research, it looked like I needed to buy a new machine foot… a free-motion quilting foot. It was a bit pricey, but I have gotten a lot of use out of it already (stay tuned for more projects next week!) and I know I will “draw” on more projects in the future. It’s a great way to merge my two art-loves: drawing and sewing. A match made in heaven!
Elizabeth has a great tutorial in the link above, so go there if you want to see the whole process. I’ll just post some work-in-progress shots:
 I have to admit that I cheated and just traced an image of The Little Mermaid from my computer screen onto tracing paper. I didn’t need this to take any longer than it needed to because I had to get these projects out in time for vacation! So after the image was traced, I went over it in Sharpie to make the lines stand out. I then flipped the image and traced it onto tear-away fusible stabilizer. The image is flipped on the stabilizer because you fuse it to the wrong side of the fabric, so the image will be reversed if you don’t reverse it to begin with – does that even make sense?! I liked the direction these images were facing, so I wanted to keep them that way for the T-shirts.
 I sewed a line with the correct colored thread, using the traced lines on the stabilizer. Then I flipped the fabric over to the right side and “darkened” the lines by sewing over them multiple times. There are a lot of helpful tutorials online on how to use a free-motion quilting foot for freehand embroidery. You’ll want to change your thread tension and stitch length to “0” so things don’t get all crazy.
Here’s an in-progress shot where Ariel looks a little… weird without hair, lips and eyebrows:
 Oh, and DD’s mom loves Mickey and Minnie, so I made her a Minnie Mouse shirt… in case it wasn’t obvious by the picture… 😉
I have a few T-shirt patterns, including Sewaholic’s Renfrew, Deer and Doe’s Plantain, and some other free ones I found online. I wanted a more relaxed fit because, let’s face it, we’re going during the Food and Wine Festival so you know we’ll need some room to grow in the mid-section. I thought the Plantain would be a good match. I tried out a different size by making this shirt as a test, so I’m starting to build my army of Plantains!
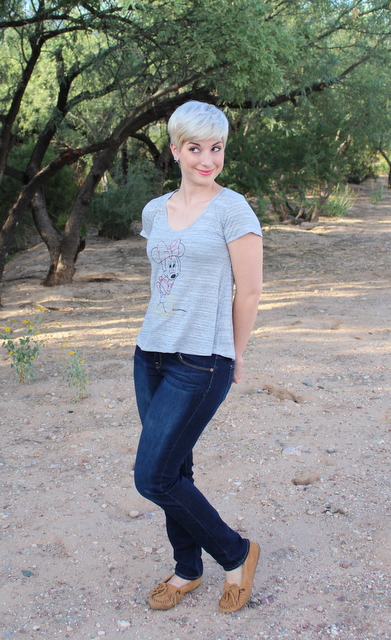
Here’s my finished shirt:
 Nobody will have this shirt in DW! Bwahahahaha! The fabric came from our local SAS Fabrics and was stupidly cheap, so I bought like 5 yards of it. It’s a nice light-to-mid-weight jersey with a good bit of stretch to keep things comfortable.
 Of course I had to accessorize with some TLM swag – starfish and all! It’s insane how much TLM stuff I have now, mostly thanks to my lovely bridesmaids from my TLM-themed bridal shower and bachelorette party. Thanks for feeding the obsession, ladies!
 I cut a size 40 at the top and graded to a 42 from the waist down. The pattern calls for a 5/8″ seam, but I wanted it to be a little roomier, so I just serged my seams at 3/8″. It’s great because it won’t stick to me in case Orlando decides to have another record-breaking heatwave while we’re there. (93 degrees in October is just WRONG, people!)
I also added 2 inches to the length so there won’t be any indecency when I bend over. I’m kind of tall (almost 5′ 8″) so I usually need to lengthen shirts.
Wearing all of this mermaid awesomeness made me want to be one, so here’s my attempt at “swimming” in the desert:
 Trying to replicate the image on my shirt…
 “I wanna be where the water is!”
 Haha ummm…
So here’s some up-close and personal shots of the stitching in case you’re curious:

 Before I started on these T-shirts, I made a “rough draft” and used the lighter colored turquoise for all of her fin. It barely showed up on the shirt and looked weird, so I had to go for a darker color. I do like how it came out with the lighter turquoise for the lines in her fins, though.
And here’s the final version of DD’s mom’s Minnie Mouse shirt!
 Heck yes!
I do wish her shoes were more visible, but I didn’t have any other color yellow in my stash that would have worked. I sewed the size 40-42 on this but serged 5/8″ seams and didn’t mess with the original length since DD’s mom is petite. I wanted it to be comfortable enough for her, so it shouldn’t be a skin-tight fit. Here’s hoping it works out!
By the way, I had to replicate Minnie’s pose…
 … but instead of looking cute and demure, I look like I’m up to no good!
And now for the close-ups:
 Too cute. 🙂
 I love how it looks “sketch”y from the thread.
I’m loving how these came out. I have a bajillion more ideas on things I want to “draw,” including some of my favorite anime characters. The possibilities are endless!
I’ll be back later with updated pictures from my somewhat me-made vacation. In the meantime, tell me if you’ve done anything like this before or something similar. I’m curious!
-RED

Sooo cute! I just might have to try this…
LikeLiked by 1 person
Thanks! I highly recommend it – it’s a lot of fun and you can do WHATEVER you want!!!
LikeLike
WHAAAAAAAAAAT. These are amazing!! I must get to that tutorial and bookmark it–your shirts make me want to do this!
BTW, Happy Anniversary!!! 2 years…you’re still l’il honeymooners! 😀
LikeLiked by 1 person
Thank you! It’s super fun and now I’m itching to do a bag or something with fun characters on it (but that’ll end up in my mental queue for years since I have too many other projects to do and so little time!).
It feels longer than 2 years since we’ve been married. The past couple of years have been crazy (life-wise, not marriage-wise). We’ve been dating since 2007 and survived across-the-world long distance… looking forward to many more anniversaries! ^_^
LikeLiked by 1 person
Fab idea, and totally personal too!
LikeLiked by 1 person
Thanks! ❤
LikeLike
Fantastic! You get an A+! Both shirts turned out so unique and really excellently. Oh the jealousy that will be created in the park! Enjoy your vacation!
LikeLiked by 1 person
Thanks so much for starting all of this with your post! DD’s mom and I wore ours the first day in the park and I just got a couple of compliments on my Ariel necklace, not my shirt, LOL! Oh well, the dresses get more attention anyway. I’m just glad the shirts were so comfortable and light in the humidity and heat. Mine will get lots of wear outside of vacation time. 🙂
LikeLike
These are so awesome!!! Do you have to have that foot for your machine to this? Is SAS Fabrics in Tucson super messy? The one in Tempe is like a fabric rummage sale and my OCD can’t take that!
LikeLiked by 1 person
Thank you! I think you might be able to do it with a regular machine foot, it will just be slower and more difficult.
I think all the SASes are like that! LOL. It’s like dumpster diving but after shopping there after a while, you get used to it and can find some really great deals. I used to take an allergy pill before going because it was crazy dusty/funky-ish and I would get flared up from rummaging through the fabric. But another plus is you work out your arms digging through everything and lugging whole bolts to the cutting table by yourself. 😉
LikeLike
Nicely done! I’ve got that foot but haven’t had a reason to use it… Before now!
LikeLiked by 1 person
Thanks – it’s a great little foot… definitely break it in! 😀
LikeLiked by 1 person
I used to thread paint like this back in my quilting days but my embroidery foot hasn’t seen the sun in a long while. Going handmade really will make you a stand out. I saw so many ppl wear Disney shwag at the park it made me a little synical, like ” congratulations. you can buy stuff” But hand made and unique, that’s attention getting.
LikeLiked by 1 person
DD and I were commenting on how much Disney stuff people were wearing (me included… he actually was like “Oh my… I didn’t realize just how many Disney shirts you owned…). Lots of it was just bought… mostly from the parks or Hot Topic, but there were some families that had cute shirts with Disney font, probably bought from an Etsy shop. But I agree – hand made and unique is the way to go! I didn’t get a picture but there was a little girl at EPCOT that had a totally handmade dress with some kind of fabric scene on the skirt – I think it was Spaceship Earth or the World Showcase or something… totally unique and cool!
LikeLike